Jul 29, 2012

Whipsocks

We had a great weekend on the Whipsaw trail and I have several pictures to share, because I'm that kind of girl.

However, under my login, Safari has disappeared. So here I am logged in under the kid's account, but the kid doesn't have access to my Pictures folder. So I'm going to fix the Safari problem on my account rather than mess with her access, and I'll be back in two shakes.

Okay, here we are, back to our regularly scheduled programming. Below are my socks-in-progress at the start of the weekend. The one on the left almost had a heel and the one on the right totally did not. Not even close. Not even started. Hubby decided that since we were at Whipsaw, and since they were socks, they shall be named Whipsocks. I'm totally on board with that.


Below is Dick's cabin and it's the second cabin that you get to when you're following the trail from the Hwy 3 side. I'm not sure whether Dick built it, or if it's just named for him, but there you go.


Dick's cross is in the front yard. I'm pretty sure Dick's not buried there, but you never know.


Bob's plaque is just to the left of Dick's cross, on the ground. I think these guys really loved the Whipsaw trail, and they're not the only ones.


These dogs did too.


This is Dillon, just up from Memorial Rock, which we encountered on Day 2. Memorial Rock is so named for another fellow who really liked the Whipsaw trail. I tried to find the photo that has his plaque in it, but it's hiding. Memorial Rock was covered in dirt this weekend, so I couldn't get a picture of it. Plus, there were 18 Jeeps driving all over the place and it would have been like Frogger to try to do anything on the rock face. Dillon's Jeep is wearing Trail Skinz.


These are sub-alpine beauties. They're about an inch across and the slightest bit purple.


This is a tiny piece of the trillion-flower garden that grows in the mountains around the Whipsaw trail. The minute the snow has melted, the flowers are starting and within days there's a covering like you wouldn't believe. Plants move fast when their growing season is so short. And they really know how to be colourful.


Okay, here we are back at Memorial Rock and this is a tire in the air.


This is my hubby driving up the very steep face of Memorial Rock. Those wires going from the good to the top of the windshield are Limb Riserz, made by the fine people at Trail Skinz.


This is how steep it is. See how the people are standing? How the trees are? When you are on the ground and you're looking at the rock face, it wouldn't occur to you to drive up it (* if you own a Jeep or other four-wheeler, you would look at it and want to drive up it). See the Trail Skinz? When you're driving down a backwoods trail and the trees and brushing and scraping against the sides of your vehicle, we call that a BC Car Wash. The Trail Skins keep the scratches out.


These are the Whipsocks against the background of the wee meadow in the overflow area at Wells Lake. If you're lucky, you get the spot right by the lake that has a shelter and some seating (and a view of the lake), but if you're us, you always seem to get the meadow a bit of a ways from the lake. There are two socks with heels in this photo.


This is our campsite, with the wee tent for two and the Hood Skinz on the Jeep. They have skulls on them. We just have them because they look cool, although another friend has them in black to cut down on reflection from his massive lights.


That about wraps it up. The socks have an inch or two of leg on them now and I'm going to do a swirly rib up the length of them. It's KnitPicks Felici fingering-weight yarn, in case you're wondering. I was a bit annoyed with it, but I'm getting over it - the striping is opposite. The socks are knit so that each has its own ball, and they're knit at the same time. They are both centre-pull balls and I should have rewound one (clearly) because they have stripes that are opposite to each other, colour-wise. It reminds me of the no-matchy-matchy fiasco with the Chroma yarn. Upways or downways, those things weren't matching.

Jul 20, 2012

I made yarn

Evening 1 - One bobbin filled.


Evening 2 - Second bobbin filled and the two plied.


End result = 108 yards of worsted / aran bulky weight from 100g of beautiful Merino roving in the Candy colourway from Unwind. Two hundred g to go.


I thought I'd have some trouble spinning anything but really fine singles, but it went not too badly. And so much quicker! If I failed to make bigger singles, I had a secret back-up plan to use more plies to get to worsted weight. That seemed like a bit of a cop-out, though, so I tried my darnedest to spin something bigger as consistently as I could. Turns out my consistency at that weight could use some practice! I could also use some practice at getting in between bulky and superfine weights....

Chocopoo Brown

After sitting in the pot cooling down, the yarn did indeed take up the rest of the colour. I had complete dye exhaustion, and I was fairly exhausted myself. Note to self: save dyeing for a day when you haven't also worked 8 hours in an office.

Here's the yarn after cooling and washing - note how it's not felted:


I was extremely hopeful because it looked like it would dry to a really rich, solid brown. And it did! If you click the picture you'll get a bigger version, in case you want to see all the chocopoo loveliness up close.


Now I just have to dye another 1000g of yarn and then get knitting. Hubby approves so it's all systems GO. He might even get that sweater in time for winter!

I have 4oz of merino/nylon roving I could dye as well, and about a pound of corriedale roving, and another pound of bfl roving ... I'm going to have so much fun!

Jul 19, 2012

The 100g Test

It's not done yet, but the first test of the lucky number 6 has commenced. I was rooting for number 6, but my daughter came home and proclaimed number 3 her favourite. Hubby voted number 6 with no hints or advice from me, so we have more in common than a child.

As I mentioned previously, I had to have 133mL of dyestock for 100g of yarn to get 2% depth of shade. What that worked out to, with the 1-1-4-4 ratio of number 6 was:

13.3mL red
13.3mL yellow
53.2mL blue
53.2mL brown

It was a dark and stormy pot....


But 20 minutes in, it was looking just a wee bit on the gray / green side. I could see from the water left in the pot that there was still a fair bit of red to go. I guess some colours 'take' faster than others.


After an hour on the simmer, I had only a bit of colour left in the water. It's sitting in the pot cooling down slowly now (we don't want felt), so it'll probably take up the rest of that colour while it sits. Ideally, we want clear water at the end. Look in the pot, though - it's still very dark. That's the yarn! 


Once I've taken the yarn out, given it a rinse and got it dried, I'll post another picture. The wet results in the pot right now look like we have indeed achieved the perfect chocopoo brown, but that really remains to be seen.

Until then!

Solar dyeing

At yarn camp, we were given a jar of natural dye with yarn in it and told to leave it in a sunny place for at least a month. Today was the one-month mark, so this is my grand unveiling:


Also, I scoured my brown samples and I think the colours are a little more discernible now. This is the original one, followed by the new one:


Or not. They kind of look exactly the same. Oh well. The 100g brown dye test is on this weekend - stay tuned!

Jul 15, 2012

Samples done


First I got out all my gear. In the Becel container I have my yarn soaking in Synthrapol to scour it and get it ready for dye.

I have four little eyedroppers that have .25, .5. .75 and 1.0mL markings - that came in very handy. One for each colour meant no mix-ups.

I got an extra plastic cup and started mixing up my yellow, blue, red and brown. Here are all the ratios I used:


Looking at the wet yarn in its wee plastic-wrapped package, I could tell that the yellow had a lot of power. I did several tests without it and I think the one that I (and the wearer of the garment to be knit with said dyed yarn) choose will be one of the non-yellow ones. They turned out more golden brown and that's not a look my manly man is likely to like.


I had to keep the packages numbered to match the notes. Once they're dry, I'll staple them into the book so that the yarn goes with the record.


You can see the strong yellow in some, a more reddy nature to others, and the ones that are the deepest browns seem to be the ones with the most blue.

Now, here's the thing: I didn't measure the amount of dye to the weight of fibre because they were six-inch pieces of yarn and I didn't want to go there. So once we pick the winner, I'll do a proper test of that  one using the right amount of dye for the weight of fibre, and see what colour I actually get. I may need to up it from my expected 2% in order to get it closer to the sample, but I can do that, so I'm not too worried. More testing is required, though.

Eventually a sweater will be born.

The Math

This is the calculation I used to get a 2% depth of shade on my 1100g of fibre using 15g of dye powder dissolved in 1L of water.

If we consider the dye company's instructions for 1% depth of shade using:

10g dye powder : 1L water
1000mL dyestock : 1000g of fibre

I could have used the same dyestock and doubled the volume of dyestock for the same weight of fibre. However, I used 1.5 times as much dye powder in my stock, so I have a stronger stock. Not quite enough to give me a 2% depth of shade (it would give me 1.5% using the same ratio of stock to fibre), so I have to calculate how much dyestock, given my stock strength, I need for the same 1000g of fibre.

1.5 x 4 = 6 / 3 = 2

I bolded those bits so we can see that I can also do 3/2 x 4/3. That gives us 12/6, which we all know as 2.

Right. So I need 4/3 (or 1 and 1/3) as much dyestock to get a 2% depth of shade on 1000g of fibre.

1000mL x 4/3 = 1333mL

Then we'll add in my 100g of fibre (I have 1100g total), so I'll take a tenth of 1333 and find it's about 133. I'll add them together, giving me 1466mL of dyestock required for 1100g of fibre.

You'll recall that I'm also going to be mixing colours to get the perfect doodoo brown, so once I figure out those ratios, I'll know exactly how much I need to mix up to get 1466mL. Then, for each 100g skein of yarn I'm dyeing, I'll need 133mL of dyestock. If I put more than one skein in the pot, I'll multiple 133 by however many skeins I'm using and then I should get dye exhaustion.

Also going into the pot are:

  • 220g salt
  • 55mL acetic acid (each adjusted for 1100g of fibre)
Look how that works out, will you? Divide those numbers by 11 (one for each skein), and you get:
  • 20g salt
  • 5mL acetic acid
Nice and even. I'll be using half the amount at the beginning, then I'll add the other half of the salt after 20 minutes of cooking and the rest of the acid after 40 total minutes. I'll leave it on to cook for close to an hour, then pull it off and let it cool in the pot so it doesn't felt. It'll continue to take up dye if there's any left to take up after an hour.

I think we're set. Let's go make the perfect brown ... and do some laundry so I have something to wear this week.

Jul 14, 2012

I love it when a plan comes together

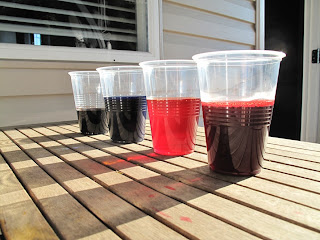
Step 1 - Create dyestocks ... CHECK!


From left to right, we have Jacquard acid dye in Chestnut, then Ciba colours Cobalt, Golden Yellow and Red.


When you look at them from above, the sun casts a shadow with a highlight that shows the colour:


(in this one they're sorted red, yellow, blue, brown)

Here's what I did:

  1. I got out every piece of dyeing equipment I own and took it to the back deck. Include in your mental image a pair of black nitrile gloves (sweaty hands inside those gloves on this delightful summer day), a particulate mask, a container of Culligan water (trying to avoid chlorine and whatnot in the tap water, although I'm not sure that's really important. I had the water kicking around, so I used it), a stainless steel pot and two kitchen scales (I like to check one against the other ... call me OCD. Actually, I'm not OCD - I'm CDO. The letters should be in alphabetical order, for heaven's sake!) 
  2. I measured 500mL of water (8oz = 250mL for those who are confused by my metric brain) and put it in the pot.
  3. I measured 15g of chestnut dye powder (that was the whole container, which claimed it was a half-ounce) and put it in the pot.
  4. I measured 1 drop of Synthrapol into the pot.
  5. I turned the heat on, got it steaming, and stirred it until the dye was dissolved.
  6. I poured it into a container that holds a litre (1000mL = 1L ... you do the non-metric math) and added another 500mL of water.
  7. I poured that into the glass jar that I'm going to store it in for up to six months. I had a little bit extra, so that went into the plastic cup. I'll use that for sampling tomorrow (stay tuned for that ridiculously exciting post).
Here's what I have to consider tomorrow:

Weight of fibre. If I know what the fibre weighs dry, I'll know how much total dyestock to use to get a 2% depth of shade, which is what I think I need to get a rich brown. I'm working with 1100g of fibre, so I'll split that and work with an even 1000g and then whatever that calculation yields, I'll add a tenth of it to make up for the extra 100g of fibre. (Yes, it would have been much easier to do this math had I used 10g of dye powder instead of 15g, but it's still a multiple of 5 and therefore not a weird or tricky number.) Each skein of undyed yarn is 100g, so when I go to do the immersion dyeing, I'll divide my total dyestock number by 11 and make sure I use that much for each skein as it goes in the pot.

I also have to figure out, since my sampling is going to be done on a very small scale, how to take the ratio that I find for the perfect blend of chestnut, cobalt, red and yellow and scale it up to the total amount of dyestock required for the fibre.  For example, if I use 2 drops of chestnut and one each for the others, that's 2:1:1:1. I can then use that in my master calculation for the 1000g + 100g of fibre.

I'm off to do some math. And eat local, fresh raspberries and peas. I couldn't resist, even though the price they charge for raspberries comes close to highway robbery. (I bought them at a place close to the side of the highway, so it's not regular robbery - it's highway robbery.)

Shut up, spellcheck - fibre, litre and colour are spelled correctly!

Jul 13, 2012

She blogged about us

I'm glad the Yarn Harlot likes Vancouver. I'm glad she's not scared to come back. I'm glad there's a yarn store close to her hotel.

I guess Tiamoe92's offer of needles didn't work out. She's really sweet to have offered, though.

Jul 12, 2012

Dude, that was good

Saw the Yarn Harlot last night for the This is Your Brain on Knitting lecture. She was fan-freaking-tastic. I really wish I had tickets to the Knitting for Speed and Efficiency class today, but the session I wanted sold out so fast. I was able to get a ticket for the lecture last night for both myself and my Mum and that was a good score. A friend from work came too, and we all really enjoyed it. The room was packed, the laughs were loud, and the vindication was large.

Hellz yeah I should knit. A LOT. It's good for my brain.

I saw my friend from Yarn Camp - Karen. She was as awesome as always, flashing her handpainted (at Yarn Camp) yarn, and knitting up a hitchhiker with it. GORGEOUS!

There were no less than three people there from my guild, which was fantastic. One of them was the first person in line, happily standing there knitting on socks while she waited. She's a continental DPN sock knitter and her fingers move like lightning. It's fun watching her.

I met a husband and wife while waiting in line. They're both knitters and he was wearing a shirt that said "Knitters have balls". Love it.

Thanks so much to Fiona and Amanda of Knit Social for putting on the event. It was a really great night out.

Jul 7, 2012

More on dyeing

I had a GREAT day with my aunt today. She's only six years older than me, and we get along really well. We had a fantastic lunch of seafood, we shopped the market and I bought some dye and dyeing supplies.

I want to dye about 1100g of merino/nylon a nice shade of brown. Real brown. Not tan or rust or anything like that ... choco-poo brown. I previously bought some brown dye, but it turns out I didn't get enough. So today I bought my primaries and I'll mix up some stock of each (four altogether, including the original brown, which, it turns out, wouldn't have been dark enough) and then I'll do some mixing. I'll test-dye a snippet for each blend and see which one I like best. I have instructions for making a 1% dye stock, but I want 2%, so I'm off to do some research.

That's all going to be FUN! 

Also, I finished a summer sweater for my wee niece today, in cotton/linen. I threw it in the washer and dryer and it's much softer now. My fingers don't really like knitting that stuff, but maybe next time I'll wash and dry the yarn before I knit with it!


Jul 4, 2012

Dying to Dye

Yes, I have been absolutely dying to dye. Dyeing. I could just dye. So I did. I had JUST procured my dirt-cheap dye pots and a bargain of an electric two-burner ... but I promised the child that we'd do some Kool-Aid dyeing, so that's what we did.


Left to right, that's lemon-lime, blue raspberry, grape and orange. Kool-Aid really is interesting to dye with, and totally safe. It's got dye in it (duh), which makes it the colour it is when it's a drink. It also has citric acid in it, which is just the thing to set the dye and make sure it doesn't wash out and stain everything in sight.

You need one package of sugar-free Kool-Aid (the kind you would mix your own sugar into, without using any sugar) per 25g of yarn or roving or fleece or whatever. I had 100g of merino/nylon blend, so I split it into four and we had some fun.

We set up the workspace with plastic wrap. The green and blue were sprinkle-dyed, where the child just sprinkled the powder onto the soaked-and-squeezed roving. The purple and orange were individually mixed with a bit of water, so there's more colour coverage on those. She did want to leave a fair bit of white, though, so don't think that that's the result you'd get.

Anyway, then we closed up the plastic wrap and put them in a steamer for about an hour. I checked after 40 minutes and they hadn't quite exhausted the dye, so a little longer seemed like a good idea. After an hour, I took them out and set them to cool. When I opened them, there was no trace of colour on the plastic, nor did any colour wash out when I rinsed them. Success!

We didn't dye the dog and he was slightly sad about that. Or maybe just bored.


I finished the Fuse cardigan - yay! I want the sleeves to be a bit longer, so I might reblock it, or perhaps just continue to tug on them. Or I could push them up and ignore that issue altogether. The pattern calls for buttons on one of those short fronts, and loops on the other. It then wraps and buttons behind the neck. I don't think I want to do that now, though. Perhaps in the fall, but right now I really prefer it open or more casually wrapped.


Thank you to Eunice, the patient sweater model. Looks like the trim on the house needs painting there, and it seems the fence needs a bit of repair. That pot could also use a plant in it ... you know, to keep the weeds down. We really should drive to someone else's house to take knitting photos.

Below are two baby crows that were on my back lawn. Then a couple days later, they were gone. But then we found some carnage in another area of the lawn. I can only hope that one made it out alive. Nature's cruel. Apparently parent crows chuck their young out of the nest when they're within a week or two of flying because it's safer to have them spread out than to have them be easy pickins in a nest. I'd never heard of that, but there's a really smart crow guy on the internet and I found his site when I was in a mad panic about saving these birds. I settled down after reading his material. Dude knows what he's talking about.


This one here is calling for food in that classic bird pose:


I'll be finished the niece's cardigan pretty quick, so that'll be in my next post. WOOT!